Author’s note: Extrication Today is a new column for YOU, the rescuer, to stay current with the concerns, issues and problems we encounter on the street with vehicle-related incidents. In the coming months, learn about cutting-edge technology fused with tool evolutions for today’s vehicles we respond to. I’ll also be looking at out-of-the-box space-making techniques as well as patient management. While I have quite a list of topics in store for you, I also want to hear from you! What are you seeing, actually encountering in responses, and let me know your concerns — I want to hear about them! Please e-mail me at David.Dalrymple@firerescue1.com. In future articles, I’ll also be incorporating video and PowerPoint presentations you can download to use for your own educational programs.
As us rescuers know, most MVCs end up upright with the vehicle sitting on its wheels. Normally we grab a wedge to chock a tire and four step chocks to stabilize the vehicle.
Now a decade or so ago, no sweat. Step chocks slid right under and knocked a wedge to make them tight or deflated the tires — or both — to make the vehicle rock solid to put tools to.
But how about today? Low profile tires, wider rims (more than 20" in some applications), run flat tires and tire pressure monitoring systems with steel valve stems have changed the tires and wheels in vehicles. And what about the ride height of vehicles now?
Early in the decade, we saw the influx of SUVs and pickup trucks, but now we’ve seen new trends. To assist in mileage and performance, vehicles have become lower to the ground and on some models the bodywork has been designed to make the vehicle edges even lower.
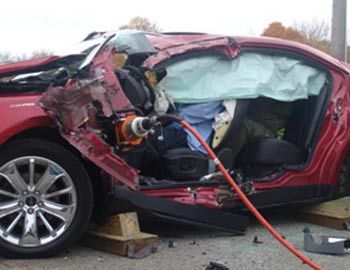
Added into this is the way vehicles are now constructed and their ability to absorb crash energy, especially from the front and rear to allow the structure to crush and redistribute that energy throughout the vehicle. That even includes the drive train dropping down on the ground and even the tires deflating.
Now this makes a difference to us in many ways, but let’s start with the most basic principle — stabilization. How far can you get those step chocks in today? One, maybe two steps? And then you have the issue of them sticking out far enough to become a trip hazard, even getting in the way of simple door or side evolutions.
Let’s talk about a different approach to this issue, with flexibility and speed foremost in our minds. A different kind of chock.
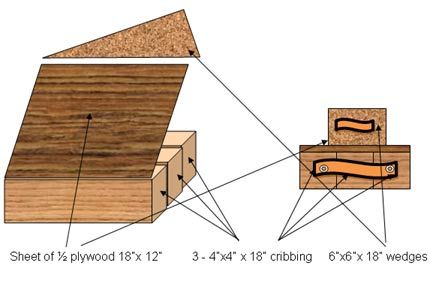
Let’s coin this device a “quick chock.” The quick chock is comprised of two pieces. The first piece is a platform of three or four 4×4 cribs, 18 inches long, screwed and glued together with a top plate of ½ plywood screwed on top of the platform.
The second piece is a 6×6 or 4×6 wedge, approximately 18 inches long. The quick chock is also placed under the vehicle like step chocks, with the platform being the base and the wedge driven in between the platform and the vehicle underbody.
 |
You can build these easily in the station. This allows for rapid set up and a flexible approach. Depending on ride height and vehicle damage, you can add or subtract parts to fill in space to stabilize the vehicle. The nice thing about the entire system is it’s flexible, fast and easy to apply.
We should always ensure the vehicle is stabilized, even if the drive train is on the ground; we can use the wide wedges behind the front tires and slide the platform and wedge in front of the rear wheels.
Not only does this give us flexibility, but we can place our stabilization flush against the vehicle and actually place more contact with the vehicle and the ground.
One of the nice things about quick chocks besides flexibility in application is the fact they also take up less storage space on apparatus as well.
Check out this diagram on how to build a quick chock:
 |
As you can see from the diagram, quick chocks are pretty simple to build: three 4x4 cribs with a sheet of ½ plywood screwed and gorilla- or wood-glued to the cribs. In fact, it is a good idea to also glue each of the 4x4s to each other as well.
By taking some spare webbing or seat belt webbing from a practiced-on vehicle from a drill or training program, you can make a handle for both the quick chock platform and the wedges for the quick chock.
Once you’ve made them, there are some other ways you can utilize quick chocks in operations. First, we can use the platform for when we need to cross-ram the vehicle interior; this way we can spread the force from the ram head out.
We can also use more than one platform at a time to gain height when faced with an SUV or pickup truck. And we can even use the platform for our smaller lifting bag platforms.
In addition, the wedges can be used when we’re faced with a damaged vehicle that’s very close to the ground, either alone or on top of single cribbing. And since the wedges are larger, we can use them to chock larger vehicle tires.
While step chocks are still useful, quick chocks give us a better option with today’s vehicles, offering enhanced flexibility for our cribbing tasks on scene at a MVC.
Be safe out there, rescuers!


